Anyone with an account can upload source strings to Zanata. The first step is to create a project:
- Create a project.
- Create a version under the project.
- Upload documents to the version:
- Using the website
- Using the command-line client push command
Project creation through the website
To start creating a project on the Zanata website, click the + button on the Project tab in your dashboard.

Projects page.
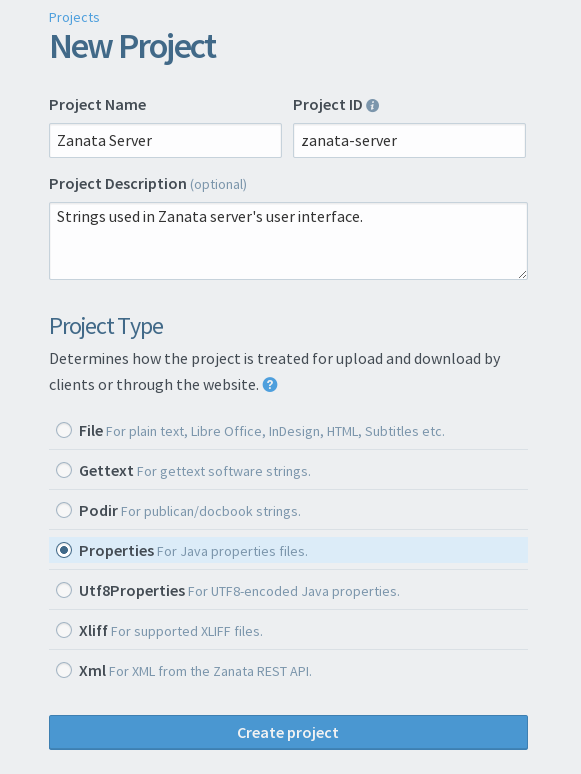
The following screenshot shows the project creation page. In the screenshot, all fields have been filled in to illustrate the process. This example would create a project with a URL ending in '/zanata-server', that will be displayed in the project list as 'Zanata Server'. Details for each of the fields are shown below.

Project ID
Project ID is a unique identifier for your project that will be used in the project's URL and in client configuration files. It accepts only letters, numbers, periods, hyphens and underscores, and cannot contain any spaces.
Name
Name is the display name for your project. Name is shown in all places that your project is shown, such as the project list, user dashboard and your project page. This should be a name that allows translators to easily recognize your project.
Description
A short description to provide a little more information for translators to identify your project. Description is displayed in the project list.
Project Type
Project Type defines the type of files that your project uses to store source and translation strings. This setting ensures that files for your project will be downloaded in the correct format.
There is a brief description for each project type next to each project type option. If the description is insufficient, more information on each project type is available at the Project Types.
Project Settings
Once the project has been created, the maintainer can customize the project appearance and behaviour as required. See the Project Settings Help for details on project settings.
Project creation from command line
Projects can also be created using the command-line client. See the help output of the client for a list of available options.